Friday, December 17, 2010

Provide custom validation messages using setCustomValidity in HTML 5 pages

If you have come through my other note on "Form validations on HTML 5", you already know that HTML 5 is promising enough to make validations better and native. Just set the right properties for the INPUT elements and HTML 5 gives you on-the-fly validations with less code. But, in some scenarios, we might have to include additional logical validations, in which case, setCustomValidity() function can be used to logically decide and set your own validation messages.

Below is a simple sample code that will demonstrate the usage of setCustomValidity() functionality.
<!DOCTYPE html>
<html>
<head><meta charset="utf-8">
<title>HTML5 Sample Validation Page</title>
<style type="text/css">
body
{
    font-family:Arial;
    font-size:12px;
}
.valid
{
    color:#000000;
}
.invalid
{
    color:#FF0000;
}
</style>
</head>
<body>
<form id="form1" method="post">
<label>Age: <input type="number" required="true" value="50" min="18" max="60" step="1" oninput="validate(this)"> (between 18 and 60)</label><br /><br />
<div id="validateMsg"></div><br />
<div id="validity"></div>
<script>
function validate(input) {
    //logically decide and set custom validation message
    if (input.value == "20" || input.value == "30") {
        // set custom validation message
        input.setCustomValidity('Your Age (' + input.value + ') is in a transition phase.');
    } else {
        // reset the validation message - makes it valid for checkValidity function
        input.setCustomValidity('');
    }
    document.getElementById('validateMsg').innerHTML = 'Validation Message: "' + input.validationMessage + '"';
    document.getElementById('validity').innerHTML = 'checkValidity function output: "' + input.checkValidity() + '"';
}
</script>
</form>
</body>
</html>
Concept:
In this example, Age input is expected to accept only values between 18 and 60. Additionally, 20 and 30 ages are also treated as Invalid (of course, unusual scenario). This is done by using setCustomValidity() function which will internally set the validationMessage property of the input control. The HTML 5 form validation function checkValidity() takes the validationMessage in to account and provides output as shown below, in Google Chrome.

Valid Input:

Invalid Input:

Custom In-valid Input: (20 and 30 are not accepted):

In valid scenarios, validationMessage is an empty string and checkValidity function returns true. In In-valid scenarios, including our custom invalid scenarios, checkValidity function returns false and validationMessage is returned based on the custom message set.

Form Validation using checkValidity and Validity in HTML 5 using JavaScript- Sample Code

The next major version of the HTML standards (HTML 5) seem to have numerous improvements over the current standards. Most of the functionalities, for which the developers has to write extensive custom code, will get reduced to a certain extend by the launch of new standards.

The below sample shows how to perform a FORM validation for an HTML 5 input element using the newly introduced "Validity" property associated to an input element. This will also demonstrate the usage of checkValidity() function which can be used to identify whether the the form elements are all validated to proceed with the server communication.

Skill level: For Beginners

Sample Code:
<!DOCTYPE html>
<html>
<head><meta charset="utf-8">
<title>HTML5 Sample Validation Page</title>
<style type="text/css">
body
{
    font-family:Arial;
    font-size:12px;
}
.valid
{
    color:#000000;
}
.invalid
{
    color:#FF0000;
}
</style>
</head>
<body>
<form id="form1" method="post">

<label>Age: <input type="number" required="true" value="50" min="18" max="60" step="1" oninput="validate(this)"> (between 18 and 60)</label><br /><br />
<div id="validateMsg"></div><br />
<div id="validity"></div>
<script>
    function validate(input) {
        var out = document.getElementById('validateMsg');
        if (input.validity) {
            if (input.validity.valid === true) {
                out.innerHTML = "<span class='valid'>" + input.value +
                            " is a valid age.</span>";
            } else {
                out.innerHTML = "<span class='invalid'>" + input.value +
                            " is not valid age.</span>";
            }
        }
        document.getElementById('validity').innerHTML = "checkValidity() output: <span class='invalid'>" + input.checkValidity() + "</span>";
    }
</script> 
</form>
</body>
</html>

Concept:
The input element is a number element (that accepts "Age") in this example, with maximum and minimum values set in the design mode. [If more information is needed on the Input elements, refer here.] During the user input event, a JavaScript function validate() is called. This function validates the input value using the input.validity.valid property and provides appropriate message, after checking for the support of this functionality.

checkValidity() function is called to check and understand the value that it returns for the successful and unsuccessful validation scenarios.

Here are the output screens:

Valid Input:

Invalid Input:

As you can see, the checkValidity() always seems to return false. It returns true for values less than 10. It is being suspected that the inadequate browser support is one reason behind this weird behavior OR i'm missing something. However, as per the documentation here, this function will help us to check and trigger functions based on the invalid/valid state of one/multiple elements, thereby assisting us in form validations.

In the above code, the script tag is provided inside the body tag, for the sake of easy understanding. Keep it inside the HEAD tag, as it is usually done.

Sunday, December 12, 2010

HTML 5 Sample page with sample code for newly introduced INPUT elements

Here is a sample code for an HTML 5 page with the new input elements, which has the minimum set of properties defined so as to get a feel of how the new HTML standards are coming up. This will also give us an idea on how these changes are going to affect the user experience once they gets implemented in web pages.

Let us start by specifying the HTML 5 doc-type as shown below.
<!DOCTYPE html>
At the time of this writing, below are the type of input elements that are available. Most of these new element types are being supported in Google Chrome.

Keyword State Usage
search Search <input type="search">
number Number <input type="number">
range Range <input type="range">
color Color <input type="color">
tel Telephone <input type="tel">
url URL <input type="url">
email E-mail <input type="email">
date Date <input type="date">
month Month <input type="month">
week Week <input type="week">
time Time <input type="time">
datetime Date and Time <input type="datetime">
datetime-local Local Date and Time <input type="datetime-local">

Here is the sample HTML code showing the basic features of the newly introduced input controls. For sake of simplicity, the properties are kept to a minimum. Even the layout beautification is ignored.

Simple Sample Code:
<!DOCTYPE html>
<html>
<head><meta charset="utf-8">
<title>HTML5 Sample Page</title>
<style type="text/css">
body
{
    font-family:Arial;
    font-size:12px;
}
</style>
</head>
<body>
<form id="form1" method="post">
Search:
<input type="search" placeholder="Search text here"><br />
Number:
<input type="number" value="50" min="40" max="60" step="5" autofocus="true"><br />
Range:
<input type="range" value="50" min="40" max="60" step="5"><br />
Color:
<input type="color" value="#000000"><br />
Telephone:
<input type="tel" placeholder="999" pattern="[0-9][A-Z]{3}" title="A part number is a digit followed by three uppercase letters."><br />
URL:
<input type="url" value="http://www.google.com"><br />
Email:
<input type="email" multiple value="me@somewhere.com"><br />
Date:
<input type="date" max="2050-12-31" min="2000-01-01" value="2010-01-01"><br />
Date Time (Time zone information included):
<input type="datetime" value="2000-12-31T00:00+05:30"><br />
Local Date Time (No Time Zone information):
<input type="datetime-local" value="2000-12-1T00:00"><br />
Month:
<input type="month" max="2000-10" min="2000-02" value="2000-04" step="2"><br />
Week:
<input type="week" max="2000-W50" min="2000-W05" value="2000-W06" step="2"><br />
Time:
<input type="time" max="23:00:00" min="01:00:00" value="04:30:00" step="5"><br />
File Upload:
<input type="file" accept="image/*" name="image" multiple onchange="updateFilename(this.value)"><br />
<input type="submit" value="Submit"/>
</form>
</body>
</html>

The above sample code also includes the usage of new properties like multiple, pattern, placeholder, autofocus, min, max, step etc.

Here is how it looks in Google Chrome.

Yes, it looks ugly (though it serves the purpose)! Feel free to copy the code and beautify/change it as needed. Let me know whether there is any changes, since the specification is fairly new.

References:
http://www.whatwg.org/specs/web-apps/current-work/multipage/the-input-element.html#input-type-attr-summary
http://www.whatwg.org/specs/web-apps/current-work/multipage/common-input-element-attributes.html#the-multiple-attribute

Sunday, November 21, 2010

Port forwarding through a modem and router to expose and enable communications to local services - How to?


I’ve been trying to expose few ports on my machine to the public, for the past few days. I started off assuming that this will be a simple task to do. Even after trying different configuration settings found from Googling, I was not successful. As I’m not a networking guy, I was missing few basic things which were crucial for this to work. Combining all these learning, here are the steps that you will have to take to successfully forward ports to your desired local machine.

The purpose:
This might vary from person to person; sometimes you might want to locally deploy a web site and expose it for testing to your friends OR you might want to open up your MySQL or utorrent Web UI so that it is publicly accessible. From a networking perspective, all of these scenarios lands up in opening up ports in your router to the PC in which these services resides. By default, most of these ports are closed.

Network Structure:
Assuming that the following is your existing network structure, let’s see the steps involved.


Initial Steps:
Here are basic information needed to start with
  • The port to be opened up; in my case, this is 61799
  • The local IP address of the system which will be running the target service; Ex: 192.168.1.3
  • IP address of the router and your public IP; the IP address that represents you in the world.
Make sure that the IP addresses are static.
Before starting with the steps involved, we need to make sure that all these addresses does not get altered over time. This is important because most routers assigns IP addresses dynamically to each of the PC/clients using DHCP, as and when they initialize a connection with the router. Based on the Lease time (the time for next renewal), the IP assigned to one client-PC might get changed later.

So, let’s first give your PC a static IP first. if your PC is already on static IP, skip this step.
Conceptually, what you are going to do is to understand the preferred network settings and set them to your network adapter-card. You will also disable dynamic IP address renewal in your PC. Based on the OS that you have, static IP assignment process can vary. Here is one site that explains this. A typical settings can look like this.


One most important thing here is that, even though you have told your PC to have a static address, you should tell your router you assign the same. Otherwise router will still try to dynamically renew the PC’s IP which will lead to conflicts. To accomplish this, set the router in such a way that the router’s DHCP does not include this address. However, care should be taken that the existing clients can still run on dyncamic IP assignment process. In order to do this, the best step is to set a range for DHCP an assign an IP out of this range to the PC. It is always better to limit from the top range so that you are not touching the router/modem IP settings, which are usually on the lower range. From my settings below, i freed up IP addresses above 192.168.1.100


So, now the
  • Local PC is set with the IP 192.168.1.101
  • The port to be opened up is 61799
  • The router IP is 192.168.1.2 (usually this is 192.168.1.1). this is the IP at which the router’s web console resides. 
Port forwarding:
Now, let’s welcome and guide the requests from the outside world to the local PC. This is done using port forwarding. For beginners, let’s assume that port forwarding is like guiding a guest from one door to the destination room in your house. Some time, this can involve going through multiple doors(ports) OR just a single door. This is a very limited or primitive way of looking at it. From networking perspective, there is more to it. Just like your house to be secure, most of these doors are closed, by default. That’s why you need to open this up.

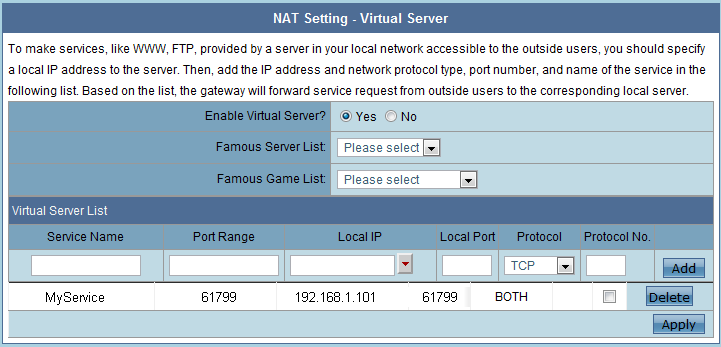
Port forwarding is sometimes called Virtual Servers. The trick is to access the router’s configuration page and find the page for this setting. Basic information, the page will ask for is
  • the service name (just for your identification)
  • the incoming port (when some one comes to this door)
  • the local PC (route to which computer)
  • the target port (to which door; the port at which your service is keep listening to so that it can accept the request). 
Here are the screenshots as per my router.


Allow access for the Port in Local PC - Firewall changes:
The final step is to make sure that the port is opened for access in your local PC. To open the port in your local PC, access the advanced settings of your firewall in your local PC and add a port exception. Most windows OS handles this section seamlessly. Basically we are trying to tell the firewall that if any request comes through 61799 door, let it come through.if you are looking for Step-by-step instruction for this, googling will help! Below are the major parts in this process, in screenshots.


Public IP Address:
Let’s identify the public IP of your’s . Most of the ISP( internet service provider) will assign an IP for your network, each time you connect to it. if you have a static IP bought from your ISP, ignore this section. Otherwise, you can have to find out your piblic IP using websites like whatismyip.org

That's it. You’re done. Use any of the online port check tool to confirm whether the port is open. canyousee.org is one such site. Make sure that your service is running at your local PC while checking. Once this is confirmed, you should be able to access the service at [public IP]:[port]. For example, an http service can be requested by http://ppp.ppp.ppp.ppp:61799/ where ppp.ppp.ppp.ppp is your public IP.

Tip:
There are FREE tools available that can give you a domain name for your IP, even if changes dynamically. You can register with them that will get you and address like http://you.theirname.com. You might have to download few apps to refresh thier records as and when your IP changes. These changes will be done automatically and you will now have a public address by using this. With this, your address for the service will be http://you.thiername.com:61799. Few free sites are http://www.dyndns.com/http://www.no-ip.com/,  http://asus.freeddns.com (free for ASUS products)


Multiple Router Scenario:
For most common network structures, the process is now complete. But tragically, my network structure were slightly different. It is something like this.


Here, the modem that i was having, the one that my ISP gave me, was not really a modem; that was also a router. In this case, i had two routers in my network and all the clients were connected to my second router.

The ideal way is to make the second router work as a Access Point and make the above explained changes in the primary router. This is possible, if your secondary router is capable to work as an Access Point. Even though my router ASUS RT-N14U is capable to do so, i tried to make it work without any changes to the existing system, keeping the secondary router as a router itself.

Primary router changes - Port Forwarding to secondary router:
Here are the steps involved to make this happen:
Connect the primary router directly to your local PC.
Access the administrative module which might be residing at http://192.168.1.1. In my case this was a Beetel 220bx modem. so, by default, it will not show you the advanced options. Little bit of googling showed that http://192.168.1.1/main.html and http://192.168.1.1/index.html are the two pages that exposes the options. Accessing main.html provided me the options to configure a virtual server in my primary modem.

The virtual server in my primary modem was set as
  • Incoming port: 61799
  • Target IP: IP address of the secondary router (192.168.1.2)
  • Target port: 61799
What i told here is to route all the requests from public at 61799 to the same port at 61799 to my second router, which is already set to route the request to my local PC.

Once the settings are done, turn off the machines and get back to your original network structure. This was the final step i have to do and get this working.

If there are other ways to achieve the same, let me know as comments.

Sunday, February 21, 2010

Solve absolute URL – relative URL issue without code changes using BASE tag (Google AJAX Feed API)


The Application


I was trying out a sample application using Google AJAX Feed API. The feeds were requested from a C# windows application and the responses (feed’s HTML content) were shown in a WebBrowser control.

The Problem

The weird problem was that the HTML snippet for some feed has relative URLs and they failed to display in the WebBrowser control. [For those, who are wondering what a relative and absolute URL is, see below.]

<!-- absolute URL -->
<img src="http://www.mywebsite.com/images/image.gif" />

<!-- relative URL -->
<img src="images/image.gif" />

When i searched for it, few were trying to do a content search and to replace the relative URLs with absolute URLs. Well, this might be needed in some scenarios, but, not in my case, since the content gets rendered in a WebBrowser control.

The Solution

The BASE tag can help us here. For me, I just put the feed content inside an HTML header section with BASE tag as shown below and now my feed renders fine; added the BASE-Target option also to make it better.


<html>
<head>
<base href="http://www.mywebsite.com/images/" />
<!-- in the case of Google API, this was feed's link -->
<base target="_blank" />
<!-- Provided this so that the links will open in new window -->
</head>

<body>
<!-- in the case of Google API, body has feed content -->
<img src="image.gif" />
<a href="http://www.mynewwebsite.com">New Website</a>
</body>
</html>

The Conclusion

Hope this solves the problem for few and the logic (use of BASE tag) will be useful in other scenarios too. As for the Google AJAX Feed API, I'm hoping that Google will fix this in the upcoming versions.

Saturday, February 13, 2010

Create simple and reusable objects for AJAX in JavaScript – ajaxRequest

Well, there are similar ones out there. jQuery, YUI and AjaxObject are just to name a few, which has their own implementations along with other in-built functionalities. Then there is mine, which is done in a much simpler way with the cost of flexibility. If you’re just looking for a simple reusable JavaScript class for making AJAX calls (and AJAX calls only), you're at the right place.

For Beginners:
For the sake of the simplicity of this article, i will not be going in much detail about the basics of HTTP calls, the different modes (POST, GET) of communications and their related topics. Let’s just say that, an HTTP call or an AJAX call can be made to a URL (Ex: http://www.mywebsite.com) using either GET (where URL has all the information like http://www.mywebsite.com?name=john&age=25) or POST (where the form data is submitted as key-value pair like key1=value1&key2=value2 with appropriate header information on the request). Oops! did i just said everything about HTTP calls in one sentence? No, there is more.

The ajaxRequest Snippet
Here is the ajaxRequest’s code. The code is pretty straightforward and is designed in such a way that it works with minimum arguments. There are comments embedded in the code (download from below) and sample usage code provided below to make it’s use seamless.

function ajaxRequest(url, method, postData) {
//validation start
if (url == undefined) return false;
this.method = method == undefined ? "GET" : method.toUpperCase();
if (this.method != "GET" && this.method != "POST") return false;
if (url == undefined || url == "") return false;
//validation end
this.url = url + ((url.indexOf('?') > 0) ? "&ajts" : "?ajts") + new Date().getTime();
var mainCls = this;
this.inProgress = false;
this.xmlHttpObj = null;
this.postData = postData;
this.toString = function() { return "Ajax by Sanal"; }
this.abort = function() {
if (mainCls.inProgress) {
mainCls.xmlHttpObj.abort();
mainCls.inProgress = false;
mainCls.xmlHttpObj = null;
}
}
this.execute = function(statusChangeFunction) {
try {
// Firefox, Opera 8.0+, Safari
mainCls.xmlHttpObj = new XMLHttpRequest();
}
catch (e) {
// Internet Explorer
try {
mainCls.xmlHttpObj = new ActiveXObject("Msxml2.XMLHTTP");
}
catch (e) {
try {
mainCls.xmlHttpObj = new ActiveXObject("Microsoft.XMLHTTP");
}
catch (e) {

return false; //No support for AJAX
}
}
}

mainCls.xmlHttpObj.onreadystatechange = function() {
if (statusChangeFunction) {
statusChangeFunction(mainCls.xmlHttpObj.readyState, typeof (mainCls.xmlHttpObj.responseText) == "unknown" ? null : mainCls.xmlHttpObj.responseText, typeof (mainCls.xmlHttpObj.responseXML) == "unknown" ? null : mainCls.xmlHttpObj.responseXML, mainCls.xmlHttpObj.readyState==4 ? mainCls.xmlHttpObj.status : null);
}
if (mainCls.xmlHttpObj.readyState == 4) {
mainCls.inProgress = false;
mainCls.xmlHttpObj = null;
}
}

mainCls.xmlHttpObj.open(mainCls.method, mainCls.url, true);
if (mainCls.method == "POST") {
mainCls.xmlHttpObj.setRequestHeader("Content-type", "application/x-www-form-urlencoded");
mainCls.xmlHttpObj.setRequestHeader("Content-Length", mainCls.postData.length);
}
mainCls.inProgress = true;
mainCls.xmlHttpObj.send(mainCls.method == "POST" ? mainCls.postData : null);
return true;
}
}

Code Download
The above code with embedded comments, along with the minified version, can be downloaded from here. [In case, if you don't know, minified version will not have the comments and spaces, to keep the file size to a minimum possible, making the server-browser communication faster.]

Sample usage:
Provide a reference

First, let the browser know that it needs to load the script.

If you're using the minified version, change the file name appropriately.

Create an Object
Then, in another scripting place, create an object for ajaxRequest as shown below. In the example below, the testAjax function will be the function that triggers the AJAX call to the server url “ajaxprocessor.aspx” which in turn processes the aynschronous requests. Since there are no other arguments passed, the call is defaulted to a GET call and the URL is expected to have input parameters for server processing.

function testAjax() {
var myAjaxRequest = new ajaxRequest("ajaxprocessor.aspx?name=john");
myAjaxRequest.execute(processMyRequest);
myAjaxRequest = null;
}

One minor point to note here. Among the query strings that are being passed to the URL, it is not recommended to use the key "ajts" (AJAX timestamp) since that is being used by the ajaxRequest to make every AJAX call unique to the browser. This is applicable to both GET and POST requests.

Track your AJAX call
The “processMyRequest” function in the above code is the callback method, that gets executed when for every state change of your AJAX call. A simple implementation of the “processMyRequest” can be something like this. I’m assuming that you have a DIV with the id “myDIV” placed in your web page. [Beginners, you might want to know more about readyState and status for asynchronous calls]

function processMyRequest(readyState, responseText) {            
if (readyState == 1)//loaded
document.getElementById("myDIV").innerHTML = "Loading...";
else if (readyState == 4)//complete
document.getElementById("myDIV").innerHTML = responseText;
}

The callback function can be created with any number of arguments depending on the need. The arguments are in the order as specified in the main ajaxRequest code comments.

The sample approach can be used to make a POST call by changing the object creation as

var myAjaxRequest = new ajaxRequest("ajaxprocessor.aspx","POST","key1=value1&key2=value2”);

Refer the downloaded ajaxRequest code for more technical details on each of these methods and variables.

Browser Compatibility
This code has been tested with IE, Firefox and Chrome and is expected to be working in most of the browsers. If problems are found, share them so that everyone will know.

Enhancements
Well, as mentioned at the beginning of this article, this might not be flexible enough. if you dig deep enough, you might find functionalities that could’ve included to make it better. Feel free to change the code for your usage and let me know what was missing.

Thursday, February 4, 2010

Retrieve an element's width or height using JavaScript

Even though, not 100% browser independent, the following JavaScript code will get you an element's current/rendered width or height. The code is pretty simple and self-explanatory.

Code to retrieve element's width:
function getWidth(element){

    if (typeof element.clip !== "undefined") //netscape
    {
        return element.clip.width;
    }
    else {
        if (element.style.pixelWidth)//opera 
        {
            return element.style.pixelWidth;
        }
        else //IE and firefox
        {
            return element.offsetWidth;
        }
    }
}
Code to retrieve element's height:
function getHeight(element){

    if (typeof element.clip !== "undefined")    //netscape
    {
        return element.clip.height;
    }
    else {
        if (element.style.pixelHeight) //opera
        {
            return element.style.pixelHeight;
        }
        else //IE and firefox
        {
            return element.offsetHeight;
        }
    }
}
Sample Usage:
function usage(){
 alert(getWidth(document.getElementById("yourElementId")));
}
This code works for most of the input (dropdown/select-one/Select-multiple, textbox, textarea) elements in an HTML form. Feel free to share any better solutions.

Thursday, January 7, 2010

Picasa Vs Windows Live Photo Gallery - A quick comparison

If you're someone who went out to choose between Picasa and Windows Live Photo Gallery, don't look further. Picasa is the clear winner. At this instant, there are not even comparable. Read ahead for more information.

User Interface - Intuitiveness and simplicity
    Live photo gallery is simple and easy. The UI is not much congested as Picasa; may be because of the less visible features of Live gallery. Gallery is easy to play with. Picasa's UI has more options with various view modes and sliders all around providing greater flexibility. If your priority is for simplicity, Live Gallery wins here. But if you prefer flexibility, Picasa is the one.

Face Recognition
    This is one place where Picasa rocks! Picasa has the easiest workflow (to assign the names for the detected faces in photos) available. As soon as the photos are added, Picasa scans them and groups them for you to name them. Each naming seems to improve Picasa's intelligence and face detection becomes more reliable and less error-prone. Live Gallery needs more manual activity to add people tags, making the workflow more cumbersome. Both the tools sometimes detects some part of the images as faces, while actually they are not. Live Gallery needs to improve a lot on this aspect.

Image Editing
    Again, Picasa is much better here. You will love the one touch abilities to fix your images and the ability to provide watermark or captions.

Sharing, Syncing, Email and Printing
    Both of them inherently supports their own photo sharing services online. Live Gallery supports adding Plug-ins too for sharing to other sites. Sync is much customizable and powerful operation in Picasa when compared to Live Gallery.

Export
    Picasa allows you to export photos in bulk to the desired quality and size while Live gallery just provides a rename and resize facility for single images. Just in case, if you ended having some raw images for conversion, Picasa does this job much easier. You can even export them with watermarks. Common raw formats are supported by default in Picasa. Windows Live Gallery asks us to install plug-in for this.

Multiple format support for image and video
    Well, this one may vary per user. Based on the formats that i had, Picasa handled all my videos and images without the need of any additional codec installs. Live Gallery did asked me to install additional plug-in.

Tagging
    Picasa has the leading edge here due to the availability of Quick tags and it seems to support all the standard tagging mechanisms like IPTC and EXIF.

Search
    They both performed good here since they all searched based on tags and file names and provided the results.

Additional Features
    Live Gallery provides the facility to make a blog post and to create a Data CD with the images. Picasa goes much further in this aspect with Blogging, Collage, Geo-Tagging, Places association, multiple-image Screensaver, Movie Creation, Poster creation and list goes on...

Conclude Now
    This comparison can go further covering more minute details which doesn’t seem to be necessary for inferring the result. Picasa provides much more flexibility and features in all those individual modules implemented when compared to Windows Live Gallery. Hopefully, we can expect more from Windows Live Gallery in the near future.

If you’re in the lookout for similar tools with comparable capabilities, search for iPhoto (Mac) and Adobe Lightroom.

Sunday, December 20, 2009

Compare Google, Bing and Yahoo webmaster tools – who indexes faster?


Well, we all know that these giants provide search-engines which make our life better, by pointing us to the right web pages that we’re searching for. They have their own crawlers to find out what all of these web pages has as contents and to index (assuming that you know what is indexing) them. To assist this process, they all have webmaster tools too, so that web site owners can submit and update the information related to the websites they own to these search engines using sitemaps. The following list shows their webmaster tools and the links to them, as currently available.

Google Google Webmaster Tools http://www.google.com/webmasters/
Bing Webmaster Center http://www.bing.com/webmaster
Yahoo! Site Explorer http://siteexplorer.search.yahoo.com/

Following is my experience with the above tools and the inference based on them, which might be totally different from yours and can change from time to time.

The First Experience:
    For one of my website, a standard sitemap was created and was submitted to all of these webmaster tools almost at the same time. To be precise, Sitemap was submitted to Google and Bing on the same day and was submitted to Yahoo few days later.

Result:
    Google indexed the pages first which happened with few days and started showing them in their search results. Bing took slightly more than a week to index them while Yahoo totally ignored them.

The second experience:
    After around 2 months, the site had to be moved to another domain, which means another URL. The same content had to be placed in the new links. For the sake of indexing, the old domain was kept alive with only the updated sitemap (removed old links) and the content was moved to the new website with a sitemap of its own. Again, both the website’s sitemap was submitted to these tools at the same time.

Result:
    Here again, Google found my new website within a week and started showing them as indexed. It took slightly more than a week for Google to remove my old website links from their list. For Bing, even after two months, my old website links are still showing up in results and nothing from my new website is indexed. Yahoo Site Explorer is the simple one here, since nothing from my websites has been indexed in their list until now.

Conclusion:
    May be, there are technicalities involved based on moving the same content among websites OR the dependency of various aspects that controls the indexing process for search engines is too complex to accommodate the above scenario OR the other tools does well in other scenarios. But, whatever that is, for a user, for a specific content, based on the previous and the experiences stated above, it is found Google comes up with result of your sitemap submission first regardless of whether that is positive or negative. For a moment, I thought that we are going to have multiple options for web searches. But, it looks like I will have to stick with Google for updated results.

Friday, December 18, 2009

Get and Set values for all form elements using JavaScript


Here, we will cover the basic logic to retrieve and set values for various HTML form elements using a sample JavaScript code.

This discussion assumes that you are familiar with the methods like document.getElementById, document.getElementsByName etc.. to find and load the element for further processing. For a quick note, if it is assumed that you have a textbox with id, ‘myText’, then that text can be accessed by document.getElementsById(‘myText’).

The logic is pretty simple and is based on the concept that each element has it’s own individual property to be set. Below is the table that shows just that.

Element Type Property to be used Comments
checkbox checked  
hidden value  
radio checked  
text value  
textarea value  
select-one selected
OR
selectedIndex
This is a dropdown. It can be either set by setting the ‘selected’ property of the options collection OR setting the selectedIndex property of the dropdown itself.
select-multiple selected
OR
selectedIndex
This is multi-select dropdown which is created using multiple="multiple" for a select tag. Works similar to select-one.

To get the value of a particular element, use it’s appropriate property based on the type of the element being processed. The below code shows how that can be done in a simple manner. Note that the select-multiple returns an array of selected values. This code is presented in simple if..else syntax for simplicity. Provide error catching mechanism as necessary.

function getValue(element)//returns the value
{
if (element==null) return null;
var returnValue;
if (element.type=="select-one")
{
//dropdown (select-one)
returnValue = element.options[element.selectedIndex].value;
}
else if (element.type=="select-multiple")
{
//multi-select drop down
var returnArray = new Array();
for(var i = 0; i < element.options.length; i++)
{
if(element.options[i].selected == true)
{
returnArray.push(element.options[i].value);
}
}
return returnArray;
}
else if (element.type=="checkbox")
{
//checkbox element
returnValue = Boolean(element.checked);
}
else if (element.type=="radio")
{
//radio element
returnValue = Boolean(element.checked);
}
else
{
//text, textarea, hidden
returnValue = element.value;
}
return returnValue;
}

To set the value, it’s just the reverse process, which is shown below.

function setValue(element, value)//return whether the set was successful.
{
if (element==null) return false;
if (value==null) return false;
var returnValue;
if (element.type=="select-one")
{
//dropdown (select-one)
for(var i = 0; i < element.options.length; i++)
{
if(element.options[i].value == value)
{
element.selectedIndex = i;
returnValue = true;
break;
}
}
}
else if (element.type=="select-multiple")
{
//multi-select drop down, expects the value to be an array of selected values
for(var j = 0; j < value.length; j++)
{
for(var i = 0; i < element.options.length; i++)
{
if(element.options[i].value == value[j])
{
element.options[i].selected = true;
break;
}
}
}
returnValue = true;
}
else if (element.type=="checkbox")
{
//checkbox element
element.checked = Boolean(value);
returnValue = true;
}
else if (element.type=="radio")
{
//radio element
element.checked = Boolean(value);
returnValue = true;
}
else
{
//text, textarea, hidden
element.value = value;
returnValue = true;
}
return returnValue;
}

Additional thoughts:
If, the controls are rendered from an ASP.net application, there may be times where the value from a Label control is to be set or retrieved. Since a Label is rendered as a SPAN element, this can be done by enhancing the code for checking the nodeName OR tagName (or any appropriate property) and using innerHTML to set or get the value of the SPAN element.


Friday, December 11, 2009

Simple and advanced methods for creating thumbnail images in .net using c#


When I stumbled upon GetThumbnailImage method available in the Image class for the first time, I immediately went ahead with the thought that now I have a native and efficient way to create thumbnails. I used a code similar to what shown below.

Option 1: using GetThumbnailImage

private Image getThumbNailUsingGetThumbnailImage(string fileName)
{
Image img = Image.FromFile(fileName);
return img.GetThumbnailImage(300, 300, null, IntPtr.Zero);
}

The result was quick. But, soon it was found that this will not work as efficiently as I expected. The biggest problem was that when the image got edited by any of the image editing tools out there, the thumbnail creation went wrong. It was because of the reason that GetThumbnailImage was depending up on the image metadata as it was set when the image got created. If the image thumbnail property is not getting modified by your image editing tool, GetThumbnailImage will fail to get the right thumbnail. Below is a similar method that retrieves the thumbnail from the PropertyItem collection of an image.

Option 2: Using PropertyItem

private Image createThumbFromProperty(string file)
{
Image image = new Bitmap(file);
Image Thumb = null;
PropertyItem[] propItems = image.PropertyItems;
foreach (PropertyItem propItem in propItems)
{
if (propItem.Id == 0x501B)
{
byte[] imageBytes = propItem.Value;
MemoryStream stream = new MemoryStream(imageBytes.Length);
stream.Write(imageBytes, 0, imageBytes.Length);
Thumb = Image.FromStream(stream);
break;
}
}
return Thumb;
}

Thus started a lookout for a performance-improved simple way to achieve this which resulted in the following methods. Basically, these methods used GDI+. The logic seems pretty simple, which is to create another small in-memory based on the size of the thumbnail needed. It breaks down to this.

1. Load the original image
2. Get the proportional size of the image based on the original Image size and target thumbnail size
3. Redraw the image to the new canvas

A sample code for this is shown below

Option 3: Using GDI+ for simple thumbnail
private Image getThumbNail(string fileName)
{
FileStream fs = new FileStream(fileName, FileMode.Open);
Image im = Image.FromStream(fs);
Size szMax = new Size(300, 300);
Size sz = getProportionalSize(szMax, im.Size);
// superior image quality
Bitmap bmpResized = new Bitmap(sz.Width, sz.Height);
using (Graphics g = Graphics.FromImage(bmpResized))
{
g.InterpolationMode = InterpolationMode.HighQualityBicubic;
g.DrawImage(
im,
new Rectangle(Point.Empty, sz),
new Rectangle(Point.Empty, im.Size),
GraphicsUnit.Pixel);
}
im.Dispose(); im = null;
fs.Close(); fs.Dispose(); fs = null;
return bmpResized;
}

private Size getProportionalSize(Size szMax, Size szReal)
{
int nWidth;
int nHeight;
double sMaxRatio;
double sRealRatio;

if (szMax.Width < 1 || szMax.Height < 1 || szReal.Width < 1 || szReal.Height < 1)
return Size.Empty;

sMaxRatio = (double)szMax.Width / (double)szMax.Height;
sRealRatio = (double)szReal.Width / (double)szReal.Height;

if (sMaxRatio < sRealRatio)
{
nWidth = Math.Min(szMax.Width, szReal.Width);
nHeight = (int)Math.Round(nWidth / sRealRatio);
}
else
{
nHeight = Math.Min(szMax.Height, szReal.Height);
nWidth = (int)Math.Round(nHeight * sRealRatio);
}

return new Size(nWidth, nHeight);
}

Now that we know how to draw things on the Bitmap (canvas), we can play around and create framed thumbnails as shown below. The code below will create a frame effect around the thumbnail.

Option 4: Using GDI+ for framed thumbnail
private Image getThumbNailWithFrame(string fileName)
{
FileStream fs = new FileStream(fileName, FileMode.Open);
Image im = Image.FromStream(fs);
Size szMax = new Size(300, 300);
Size sz = getProportionalSize(szMax, im.Size);
// superior image quality
Bitmap bmpResized = new Bitmap(sz.Width, sz.Height);
using (Graphics g = Graphics.FromImage(bmpResized))
{
g.InterpolationMode = InterpolationMode.HighQualityBicubic;
g.FillRectangle(Brushes.White, 0, 0, sz.Width, sz.Height);
int FrameWidth = 5;//decides the frame border width
g.DrawRectangle(new Pen(Color.Silver, FrameWidth - 2), 0, 0, sz.Width - 1, sz.Height - 1);
FrameWidth += 5;//decide the frame width
g.DrawImage(im, new Rectangle(FrameWidth, FrameWidth, sz.Width - FrameWidth * 2, sz.Height - FrameWidth * 2), new Rectangle(Point.Empty, im.Size), GraphicsUnit.Pixel);
}
im.Dispose(); im = null;
fs.Close(); fs.Dispose(); fs = null;
return bmpResized;
}

We can even extend this concept to create shades around the generated thumbnail. The below code demonstrates that on a white background.

Option 5: Using GDI+ for shaded thumbnail

private Image createThumbnailUsingGDI(ref Image imgPhoto, int destWidth, int destHeight)
{
int sourceX = 0;
int sourceY = 0;

int destX = 0;
int destY = 0;
int sourceWidth = imgPhoto.Width;
int sourceHeight = imgPhoto.Height;

Bitmap b = new Bitmap(destWidth, destHeight);

Graphics grPhoto = Graphics.FromImage(b);

grPhoto.FillRectangle(Brushes.DarkGray, new Rectangle(destX, destY, destWidth, destHeight));
grPhoto.DrawLine(new Pen(Brushes.LightGray), new Point(0, destHeight - 1), new Point(destWidth, destHeight - 1));
grPhoto.DrawLine(new Pen(Brushes.LightGray), new Point(destWidth - 1, 0), new Point(destWidth - 1, destHeight));
//shade right
grPhoto.FillRectangle(Brushes.White, new Rectangle(destWidth - 3, 0, 7, 2));
grPhoto.FillRectangle(Brushes.White, new Rectangle(destWidth - 2, 0, 7, 4));
grPhoto.FillRectangle(Brushes.White, new Rectangle(destWidth - 1, 0, 7, 6));

//shade botton
grPhoto.FillRectangle(Brushes.White, new Rectangle(0, destHeight - 3, 2, 7));
grPhoto.FillRectangle(Brushes.White, new Rectangle(0, destHeight - 2, 4, 7));
grPhoto.FillRectangle(Brushes.White, new Rectangle(0, destHeight - 1, 6, 7));
grPhoto.DrawImage(imgPhoto, new Rectangle(destX + 2, destY + 2, destWidth - 7, destHeight - 7), new Rectangle(sourceX, sourceY, sourceWidth, sourceHeight), GraphicsUnit.Pixel);

grPhoto.Dispose();
return b;

}

These methods do provides some flexibility and they are efficient enough for small scale applications. But, if we're talking about large number of images where memory and performance are critical factors, these may not suffice. We can fine tune the above methods by any/all of the following approaches and of course, lot others.

1. Having proper "using" keywords
2. making sure that the objects are destroyed properly
3. Having the thumbnail creating method loaded as static so that is always ready for you.
4. Get yourself equipped with knowledge on Graphics class which has numerous drawing capabilities and various brushes.

Once you have your thumbnail generation code ready, use it with extensive multi-threading concepts to give the user a pleasant feeling. If you're looking for any basic threading knowledge, look at my other article here.

I know, there may be few who might be hoping that we could've had something simple like GetThumbnailImage which didn't had any pitfalls. Well, there may be. System.Windows.Media.Imaging might be the place to look at for these capabilities.

Please note that this article is for learning purposes. If you are here for quick code to be used for production purposes, please look elsewhere.

Reference:
http://danbystrom.se

Saturday, November 21, 2009

How events are detected and triggered by ASP.net server during Form Submit or Postback

Remember those days when we had only a single communication to the server where we had to handle all the related events? We were not having the flexibility to attach events to each and every control and use specific event handlers in the server that time. Well, we all know those days are long gone after ASP.net came in. Given the fact that the underlying communication architecture between the client browser and server remains almost the same, have you ever wondered how ASP.net managed to attach these events and call the appropriate event handler method in the server. If you're curious, go ahead with this article. We will try to understand the basics of what is going on and how we can override and use them, in case the need arises.

Here is sample asp.net page with one text box control and two server (runat="server") buttons that has server events. They are having their default properties.

Here is the designer code:
<%@ Page Language="C#" AutoEventWireup="true" CodeFile="postback.aspx.cs" Inherits="postback" %>

<!DOCTYPE html PUBLIC "-//W3C//DTD XHTML 1.0 Transitional//EN" "http://www.w3.org/TR/xhtml1/DTD/xhtml1-transitional.dtd">

<html xmlns="http://www.w3.org/1999/xhtml" >
<head runat="server">
<title>Events and Postback</title>
</head>
<body>
<form id="form1" runat="server">
<div>
<asp:TextBox ID="TextBox1" runat="server"></asp:TextBox>
<asp:Button ID="Button1" runat="server" OnClick="Button1_Click" Text="Button 1" />
<asp:Button ID="Button2" runat="server" OnClick="Button2_Click" Text="Button 2" />
</div>
</form>
</body>
</html>

Here is the server code:
using System;
using System.Data;
using System.Configuration;
using System.Collections;
using System.Web;
using System.Web.Security;
using System.Web.UI;
using System.Web.UI.WebControls;
using System.Web.UI.WebControls.WebParts;
using System.Web.UI.HtmlControls;

public partial class postback : System.Web.UI.Page
{
protected void Page_Load(object sender, EventArgs e)
{

}
protected void Button1_Click(object sender, EventArgs e)
{
TextBox1.Text = "1";
}
protected void Button2_Click(object sender, EventArgs e)
{
TextBox1.Text = "2";
}
}


Here is client source code that was pushed by ASP.net:
<!DOCTYPE html PUBLIC "-//W3C//DTD XHTML 1.0 Transitional//EN" "http://www.w3.org/TR/xhtml1/DTD/xhtml1-transitional.dtd">

<html xmlns="http://www.w3.org/1999/xhtml" >
<head><title>
Events and Postback
</title></head>
<body>
<form name="form1" method="post" action="postback.aspx" id="form1">
<div>
<input type="hidden" name="__VIEWSTATE" id="__VIEWSTATE" value="/wEPDwUKMTk0MTQ1MTcxMWRkFKmiofOm3t+a1FeTyiSsorNM4sk=" />
</div>

<div>

<input type="hidden" name="__EVENTVALIDATION" id="__EVENTVALIDATION" value="/wEWBAKWt63zDALs0bLrBgKM54rGBgK7q7GGCNoGUvTkiMJt3F6eDcqfS57GMOdl" />
</div>
<div>
<input name="TextBox1" type="text" id="TextBox1" />
<input type="submit" name="Button1" value="Button 1" id="Button1" />
<input type="submit" name="Button2" value="Button 2" id="Button2" />
</div>
</form>
</body>
</html>


Wait, here there are some additional hidden variables auto rendered by ASP.net. Let's skip that part for now and see that our buttons are rendered as submit buttons. This is because of the reason that the Button's UseSubmitBehavior property was true, which is the default setting. Here for every events like an ENTER press in the textbox or CLICK in any of the buttons, there is a submit happening to the server. The form post data already has the information regarding the events, based on which ASP.net can process and call the appropriate event associated.


Now, let's change the UseSubmitBehavior property for the first button and see what happens.

Designer code:
<%@ Page Language="C#" AutoEventWireup="true" CodeFile="postback.aspx.cs" Inherits="postback" %>

<!DOCTYPE html PUBLIC "-//W3C//DTD XHTML 1.0 Transitional//EN" "http://www.w3.org/TR/xhtml1/DTD/xhtml1-transitional.dtd">

<html xmlns="http://www.w3.org/1999/xhtml" >
<head runat="server">
<title>Events and Postback</title>
</head>
<body>
<form id="form1" runat="server">
<div>
<asp:TextBox ID="TextBox1" runat="server"></asp:TextBox>
<asp:Button ID="Button1" runat="server" OnClick="Button1_Click" Text="Button 1" UseSubmitBehavior="False" />
<asp:Button ID="Button2" runat="server" OnClick="Button2_Click" Text="Button 2" />
</div>
</form>
</body>
</html>


Server code:
[This is same as the previous server code]

Client source code that was pushed by ASP.net:
<!DOCTYPE html PUBLIC "-//W3C//DTD XHTML 1.0 Transitional//EN" "http://www.w3.org/TR/xhtml1/DTD/xhtml1-transitional.dtd">

<html xmlns="http://www.w3.org/1999/xhtml" >
<head><title>
Events and Postback
</title></head>
<body>
<form name="form1" method="post" action="postback.aspx" id="form1">
<div>
<input type="hidden" name="__EVENTTARGET" id="__EVENTTARGET" value="" />
<input type="hidden" name="__EVENTARGUMENT" id="__EVENTARGUMENT" value="" />
<input type="hidden" name="__VIEWSTATE" id="__VIEWSTATE" value="/wEPDwUKMTk0MTQ1MTcxMWRkFKmiofOm3t+a1FeTyiSsorNM4sk=" />
</div>

<script type="text/javascript"> 
//<![CDATA[
var theForm = document.forms['form1'];
if (!theForm) {
theForm = document.form1;
}
function __doPostBack(eventTarget, eventArgument) {
if (!theForm.onsubmit || (theForm.onsubmit() != false)) {
theForm.__EVENTTARGET.value = eventTarget;
theForm.__EVENTARGUMENT.value = eventArgument;
theForm.submit();
}
}
//]]>
</script>


<div>

<input type="hidden" name="__EVENTVALIDATION" id="__EVENTVALIDATION" value="/wEWBAKWt63zDALs0bLrBgKM54rGBgK7q7GGCNoGUvTkiMJt3F6eDcqfS57GMOdl" />
</div>
<div>
<input name="TextBox1" type="text" id="TextBox1" />
<input type="button" name="Button1" value="Button 1" onclick="javascript:__doPostBack('Button1','')" id="Button1" />
<input type="submit" name="Button2" value="Button 2" id="Button2" />
</div>
</form>
</body>
</html>


We can see that there is more code from server. There are few more hidden variables and some Javascript coding. The ones that we are interested in are "__EVENTTARGET", "__EVENTARGUMENT" and the "__doPostBack" function that seems to be mimicking a submit operation. This particular function is being associated to the button to which we set a false UseSubmitBehavior. The same button is now rendered as a BUTTON type. From this, we can cut down all the drama that was happening above and infer the logic as below:

ASP. net’s event handling logic:
1. Controls that are tied with a server event are rendered with a client JavaScript event associated.
2. This client code mimics a server submit operation after filling the hidden variables [Note that the name is being filled in "__EVENTTARGET" field.
3. The ASP.net server, when receives the post data, process the hidden variables to understand the event was triggered from a non-submit button and calls the method associated to the event.

Now that we've got a glimpse of what is happening, let's try to go a little deeper. By having a small code in the Page_Load event, as shown below, we can actually get these parameters. There are multiple ways to get these. Here is one:

protected void Page_Load(object sender, EventArgs e)
{
string eventControlName = Request.Params.Get("__EVENTTARGET");
string eventArguments = Request.Params.Get("__EVENTARGUMENT");

}


It may seem that there is pretty much a straight forward process and we can go ahead with our implementations thinking that this will work always. But, it doesn't. Even though pretty basic, there are some quirks and points to be noted. Below are few among them.
a. By any means if you disable this control in the client before a submit operation, submit to the server will not happen. That is, for example, if a button gets disabled on its click event, in the client, the submit will not happen at all. The good news is that, now that we know that this happens through our favorite function "__doPostBack", we can call the same from your client code, if needed.
b. If none of these controls have their visible property set to false, the server will not render with those functions and associate them. It is understandable that we don't need to do anything with an invisible control. But, in case, if you're looking for a "__doPostBack" function and you cannot find it, this may be a reason.
c. For dynamic controls with server events, these ideas will come handy, because now we now, how to identify, trigger and disable the events and its arguments.

Note: For the sake of simplicity, I haven't covered the events related to other controls and their arguments. Also, the hidden controls "__VIEWSTATE" and “__EVENTVALIDATION" does play a role in the server communication. So, if you're looking for extended information, try searching for those two. ASP.net may change this logic in future versions. Watch out for that too.

Sunday, November 15, 2009

Elephants with Ornaments (Nettipattam), accompanied by Panchavadyam

This happens in God's own Country, Kerala, India. The Hindu Gods (usually a symbol called ‘Thidambu’, which has the power and goodness of the God) visits the neighborhood. A group of elephants are used for this purpose and the biggest elephant in the group is the chosen one to carry the God. These elephants are decorated with gold coated (Some times made of Gold) ornaments called "Nettipattam". They are accompanied by an orchestra consisting of traditional instruments which is named as "Panchavadyam". The same is also done when there is an important ceremony in the temple. Below are few snaps on these.

For more information, search for Thrissur pooram on the web, which is the biggest among these.


Nettipattam

Thursday, October 29, 2009

Two dimensional Array (Table Array) Multiple column sorting using JavaScript

Here is a JavaScript implementation for multi-column ascending sort on a table array.

Below is the code for this.
var tempArray = new Array();
//main function
function do2DArraySort(arrayToBeSorted, sortColumnArray)
{
if (arrayToBeSorted == "undefined" || arrayToBeSorted == "null") return arrayToBeSorted;
if (arrayToBeSorted.length == 0) return arrayToBeSorted;
if (sortColumnArray.length == 0) return arrayToBeSorted;
tempArray = arrayToBeSorted; 
var totalLength = sortColumnArray.length; 
for(var m = 0; m < totalLength; m++)
{
if (m == 0)
{   
doBubbleSort(tempArray, tempArray.length, sortColumnArray[m]);         
}
else
{     
doMultipleSort(tempArray, sortColumnArray[m], sortColumnArray[m-1]);
}
} 
return tempArray;
}

//basic bubble sort implementation
function doBubbleSort(arrayName, length, element) 
{
for (var i = 0; i < (length-1); i++)
{
for (var j = i+1; j < length; j++)            
{
if (arrayName[j][element] < arrayName[i][element]) 
{
var dummy = arrayName[i];
arrayName[i] = arrayName[j];
arrayName[j] = dummy;
}
}
}  
}

//appends an array content to the original array
function addToArray(originalArray, addArray)
{
if (addArray.length != 0)
{
var curLength = 0;
curLength = originalArray.length;
var maxLength = 0;
maxLength = curLength + addArray.length;  
var itrerateArray = 0;
for (var r = curLength; r < maxLength; r++)
{   
originalArray[r] = addArray[itrerateArray];
itrerateArray++;
}
}
}

//check if a value exists in a single dimensional array
function checkIfExists(arrayToSearch, valueToSearch)
{
if (arrayToSearch == "undefined" || arrayToSearch == "null") return false;
if (arrayToSearch.length == 0) return false;
for (var k = 0; k < arrayToSearch.length; k++)
{
if (arrayToSearch[k] == valueToSearch)
return true;
}
return false;
}

//sorts an 2D array based on the distinct values of the previous column
function doMultipleSort(sortedArray, currentCol, prevCol)
{
var resultArray = new Array(); 
var newdistinctValuesArray = new Array();
//finding distinct previous column values 
for (var n = 0; n < sortedArray.length; n++)
{ 
if (checkIfExists(newdistinctValuesArray, sortedArray[n][prevCol]) == false)
newdistinctValuesArray.push(sortedArray[n][prevCol]);
}  
var recCursor = 0;
var newTempArray = new Array(); var toStoreArray = 0; 
//for each of the distinct values
for (var pp = 0; pp < newdistinctValuesArray.length; pp++)
{
toStoreArray = 0;
newTempArray = new Array();  
//find the rows with the same previous column value
for (var qq = recCursor; qq < sortedArray.length; qq++)
{
if (sortedArray[qq][prevCol] != newdistinctValuesArray[pp]) break;
newTempArray[toStoreArray] = sortedArray[qq];
toStoreArray++; recCursor++;
}
//sort the row based on the current column   
doBubbleSort(newTempArray, newTempArray.length, currentCol);
//append it to the result array
addToArray(resultArray, newTempArray);
}
tempArray = resultArray;
}
The above code can be stored as TableArrayMultipleSort.js for our example usage shown below:
<html>
<head>
<title>Invoking Multiple Array Sort</title>
<script language="javascript" src="TableArrayMultipleSort.js" type="text/javascript"></script>
</head>
<body>
<script language="javascript" type="text/javascript">
function createSampleArray()
{ 
var myArr = new Array( 
new Array("Ashley","13","Male","Texas"),
new Array("Smith", "32", "Male","Colorado"),
new Array("Jane", "21", "Female","South Carolina"),
new Array("Anna", "12", "Female","Maryland"),
new Array("Ashley","13","Male","Delaware"),
new Array("Ashley","46","Male","Newyork")
); 
return myArr;
}
function showDataByRow(arrayToBeShown)
{
for(var a=0;a<arrayToBeShown.length;a++)
{
document.write(arrayToBeShown[a]+"<br>");
}
}
document.write("<b>Original Array: (Input)</b>" + "<br><br>");
showDataByRow(createSampleArray());
document.write("<br><br><br>");
var sortColumnArray = new Array('0','1','3'); 

document.write("<b>Sorted Array: (Output)</b><br>Order: First column, then by second column and then by Last Column" + "<br><br>");
showDataByRow(do2DArraySort(createSampleArray(),sortColumnArray));
</script>
</body>
</html>
When the above code is executed, this will show the input table array and output table array as shown below. Original Array: (Input)
Ashley,13,Male,Texas
Smith,32,Male,Colorado
Jane,21,Female,South Carolina
Anna,12,Female,Maryland
Ashley,13,Male,Delaware
Ashley,46,Male,Newyork
Sorted Array: (Output) Order: First column, then by second column and then by Last Column
Anna,12,Female,Maryland
Ashley,13,Male,Delaware
Ashley,13,Male,Texas
Ashley,46,Male,Newyork
Jane,21,Female,South Carolina
Smith,32,Male,Colorado
Enhancements: 1. The code can be enhanced to accomodate sort order for each of the sort columns by having a seperate array to specify that.
2. It can be relooked for performance improvements and enhanced variable handling.
3. There are few issues related to null/empty-value, if it exists in any of the columns being sorted.


Note: The objective of this article is to assist in learning the Javascript array concepts and it's usage. This code is not intended to be used for production purposes as it is not written with that aspect in mind. So, if you want to use it, use it at your own risk.

Sunday, October 25, 2009

Large Grasshopper

This big one was just sitting there having all the food that he can; finished a major portion of the plant's leaves. It's pretty colorful and is around 9.5 cm long.

If someone, who study these, is looking for a nice snap of this one, here it is. Please comment on the scientific name so that others can find this.


Wednesday, October 21, 2009

Threading in .net - for Beginners


Method 1: Using ThreadPool.QueueUserWorkItem

There may be scenarios, in which you want to have an asynchronous operation to be performed without the need of a handle on the function being called. For example, this can be an audit log or a process log operation which can be a background process while your main application performs the important operations. There is a simple single line code to achieve this using ThreadPool.QueueUserWorkItem call. Typical usage is as follows.


private void button1_Click(object sender, EventArgs e)
{
string argument = "Process started";
ThreadPool.QueueUserWorkItem(new WaitCallback(WriteLog), input);
}

private void WriteLog(object o)
{
string argument = o as string;
// Your code to log the argument
}

In this method:
1. With a single line code, you are getting the basic benefits of threading without having to worry about creating, managing and terminating a threaded operation.
2. QueueUserWorkItem call is in control of .net runtime. You will not be able to control the time at which it gets executed.
3. You cannot control the state and priority of the function being executed.

Method 2. Using ThreadStart, ParameterizedThreadStart and Thread

Below is another method that will give more control on your asynchronous operation.

a) Without having a Parameter

Class level decleration


private Thread t = null;


This can be used for later tracking of the thread being executed.

private void button2_Click(object sender, EventArgs e)
{
ThreadStart ts = new ThreadStart(WriteStartLog);
t = new Thread(ts);
t.IsBackground = true;
t.Priority = ThreadPriority.Normal;
t.Start();
}

private void WriteStartLog()
{
// Your code to log the process start
}


To track the thread, the thread object can be used. A sample usage is provided below:

private void button3_Click(object sender, EventArgs e)
{
if (t != null)
{
if (t.IsAlive)
t.Abort();
}
}


b) Passing parameters using ParameterizedThreadStart

When parameters are to be passed to the invoked method, this can be done using ParameterizedThreadStart using the medium as objects.


private void button2_Click(object sender, EventArgs e)
{
ParameterizedThreadStart pts = new ParameterizedThreadStart(WriteLog);
t = new Thread(pts);
t.IsBackground = true;
t.Priority = ThreadPriority.Normal;
t.Start("Process started");
}


private void WriteLog(object o)
{
string argument = o as string;
// Your code to log the argument
}

Now that we have covered the basic skeleton of our article, let’s see the other important aspects of threading.

Handling ThreadAbortException

There might be a need to abort the thread being executed at any instant of time. This can happen due to the user cancellation of the process or any other action like the primary thread being closed due to a various reason. At these scenarios (even when there is no need), it is mandatory to have a ThreadAbortException to be handled in the method which is being called. This can be as follows:


private void WriteLog()
{
try
{
// Your code to log the argument
}
catch (ThreadAbortException tae)
{
//handles the thread abort exception
//code to cleanup - let know the user that thread got cancelled, if necessary.
}
catch (Exception e)
{
//handle other exceptions
}
}


Communicating between main and background thread.

Consider, this scenario:
You are having a background thread to create thumbnails for pictures in a folder. For each thumbnail being created, you have to draw it on the form. That is, to communicate from the background thread to the parent thread with the output from the background thread. This is pretty simple using delegates. Here it is how it’s done.

Class level declarations:


private delegate void addPictureBox2Main_Delegate(PictureBox pbb);
private Thread t = null;


private void button2_Click(object sender, EventArgs e)
{
ThreadStart ts = new ThreadStart(LoadImageThumbNails);
t = new Thread(ts);
t.IsBackground = true;
t.Priority = ThreadPriority.Normal;
t.Start();
}

private void LoadImageThumbNails()
{
try
{
//for each of the thumbnails being created
//generate picturebox with thumbnail here
PictureBox pb = //function to load thumbnail
this.Invoke(new addPictureBox2Main_Delegate(addPictureBox2Main), new Object[] { pb });
}
catch (ThreadAbortException tae)
{
//handles the thread abort exception
//code to cleanup - let know the user that thread got cancelled, if necessary.
}
catch (Exception e)
{
//hanlde other exceptions
}
}


private void addPictureBox2Main(PictureBox pb)
{
//add the picture box pb to the parent control as needed
}


** Code samples are in C#**

Note: This article only covers the basic aspect of threading and it aims to help beginners understand the threading concepts. There is more to it. So, keep learning.